Deployment Options#
This section explains different set up and deployment options you may choose to fit your need.
Unryo covers scenarios such as: proxy collectors, multi-tenant deployments, distributed installation and clustered architectures.
| Deployment | Description |
|---|---|
| All-In-One Deployment | Install the complete platform on a single host machine in your data-center. |
| Distributed Deployment | For larger deployments, you can separate load across multiple hosts, data-centers and public clouds by distribute Unryo component (collectors, databases, portal, analytic engine, ...) across multiple hosts. All Unryo components are managed centrally and efficiently as a single environment. To install an Unryo Component individually, follow the procedure here. |
| Deploy Collector(s) | |
| Proxy Collector | To control communication directions. Unryo supports tunneling of communication between the collectors and the platform. You can get either inbound connections or outbound connections to support your security requirements. More information: vApp Reverse Tunnel and Manual Proxy Host Configuration. |
| Multi-tenant | Databases can be segregated per tenant. Access to data can be restricted as well. Unryo supports several options to centrally manage different tenants. |
| Clustered architectures | You can configure the time-serie databases and event database to run as clusters over multiple nodes. |
| Linux/Windows Agents | If you want to monitor locally your servers and applications running on it, you can install the Unryo agent for Linux or Windows. |
All-In-One Deployment#
Unryo comes with an All-In-One easy setup that install the complete platform on a single host machine in your data-center.
Three possible options are:
vApp: Follow the procedure hereDocker: Follow the procedure hereKubernetes: Follow the procedure here
Deploy Collector(s)#
Add a new Collector#
Collectors gather data from your infrastructure and ship data to your Unryo platform. You can install as many as collectors you want.
To deploy a new collector, follow the procedure here:
- Collector deployed as a Docker Container
- Collector deployed on Kubernetes
- Collector deployed as a vApp
Install multiple collectors#
For larger installations, you can deploy multiple collectors, for example one collector in every data center. To do it, simply repeat the procedure described here.
For every collector, you will need to specify the variable UNRYO_HOSTNAME in your docker-compose file in the x-common-environment declaration as shown here:
x-common-environment: &commonEnvironment
    UNRYO_BROKER_URL: "https://broker-dev.unryo.com/"
    UNRYO_HOSTNAME: "<ip address of your docker host>"
Customize docker-compose file#
If you already have a docker-compose.yml file ready from the wizard, you can simply modify the services object as you want by adding another component that uses our dockerhub images. Make sure that the new component uses valid tokens, else it won't be able to be recognized by Unryo Connect services.
You can edit things like:
- Environment variables
- Container Name
- Display Name
- Hostname
- Port Mapping
- Volumes Mapping
Installing Linux/Windows Agents#
The Unryo Agent is a lightweight program that is deployed on your hosts (Unix and Windows) for monitoring the OS performance (processor, disk, swap, processes) as well as the applications running on it.
Prerequisites#
Privileges:
- Installing the agent typically requires root or administrator privileges on the host.
Networking:
- The agent sends metric data to an Unryo Collector at port
8186/tcp. Ensure all your Agents can reach your Unryo Collector using this port (if need be, you can change to another port). - The agent retrieves its configurations from the Unryo platform at port
443/tcp. Ensure all your agents can reach your Unryo Portal (which is located in our cloud for SaaS deployments or in your network for on-premise deployments).
These networking requirements are for default architectures; your architecture may be different depending on your security requirements and your networking requirements may be different as a result.
Create an “agent” account#
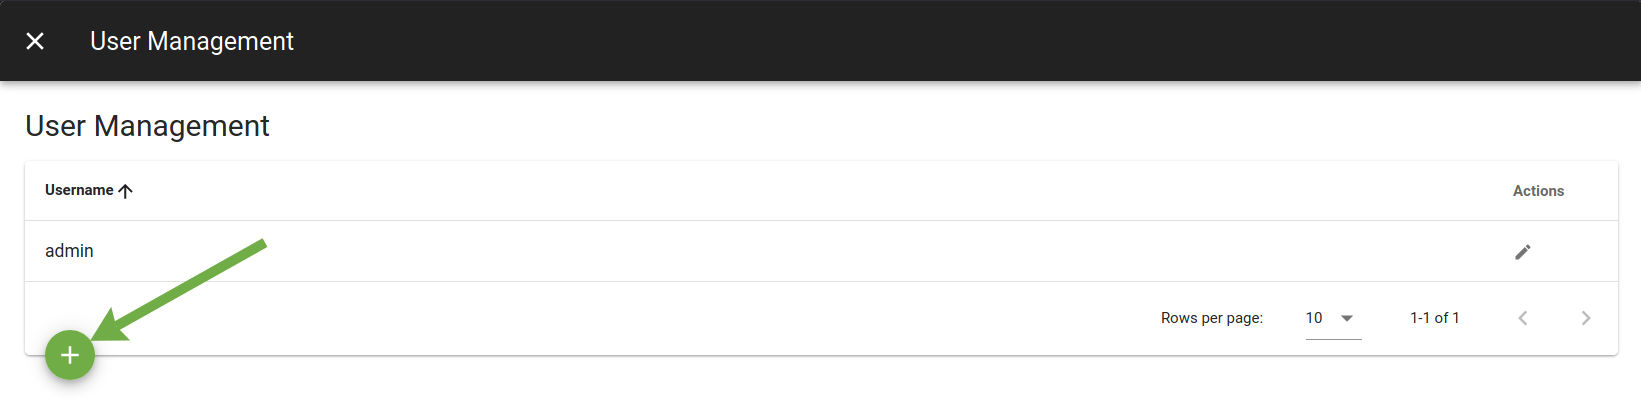
The first step is to create an "agent" account in your Unryo Portal. Click on the gear icon on the top right of your Unryo Portal, then Settings > Platform Administration > User.
![]()
Click on the white-on-green "+" button.
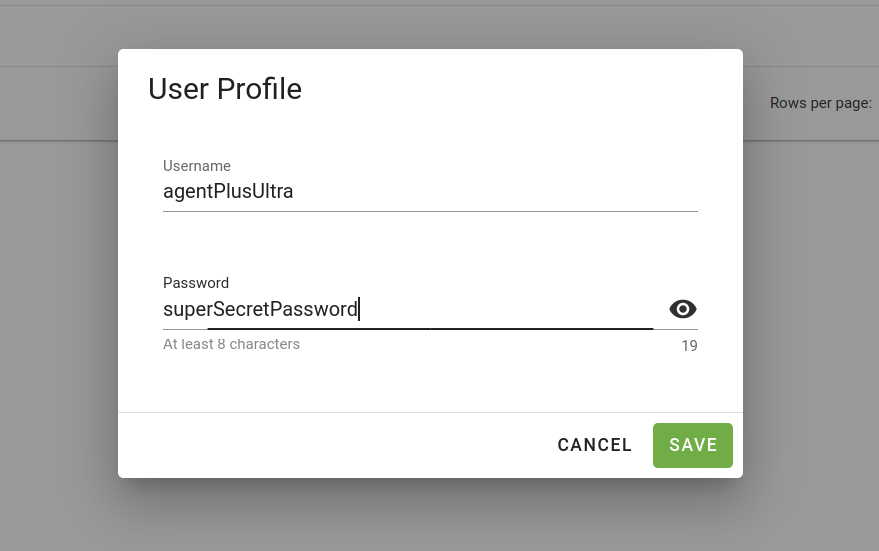
Fill in the username and password. The username must start with "agent" and the password is up to you. Make sure to keep your password safe.
Install the agent on Linux#
Step 1: Get the installer for your platform:
- On a Debian-based Linux: https://downloads.unryo.com/Unryo-Agent-Linux-latest.deb
- On an RPM-based Linux: https://downloads.unryo.com/Unryo-Agent-Linux-latest.rpm
Step 2: Run the installer
- On a Debian-based Linux: run
dpkg -i <path to Debian installer>. - On a RPM-based Linux: run
rpm -ivh <path to RPM installer>.
Step 3:: Edit /opt/unryo-agent/etc/vault-client/configuration-vault-client/vault-endpoint.toml
- This is the only configuration file on the agent, everything else is from the Unryo Monitor Web interface
- Replace
<<<<MY_USERNAME>>>>and<<<<MY_PASSWORD>>>>with the username and password for the Portal user you created at the last step, and replace<<<<MY_PORTAL_URL>>>>with your Portal URL. - If you have the
base64command: encode your credentials as follows:echo -n "<username>:<password>" | base64, where<username>and<password>are the username and password for your new Portal user. Otherwise, encode your credentials using the instructions found here. Copy the result and replace<<<<MY_ENCODED64_USER:CREDENTIALS>>>>with it. - If you have not and do not intend to set up a valid TLS certificate on your Unryo Portal, uncomment the last line. We do not recommend this.
Step 4: Start the agent:
- Run
systemctl daemon-reload. - Run
systemctl restart unryo-vault.
Linux Agent Upgrade
- If the previous version of your agent was prior to 1.0 (release candidate), then you must fully uninstall the previous version (keep the one configuration file) then proceed with a fresh install of the agent. To perform a clean removal of the agent and keep the configuration file for reuse:
- On RedHat/CentOS/Fedora based distros (rpm manager):
cp /opt/unryo-agent/etc/configuration-vault-client/vault-endpoint.toml /tmp/killall -9 unryo-vault-clientkillall -9 unryo-telegrafrpm -e unryo-agentfind /etc |grep -i unryo- |xargs -n 1 rmfind /etc |grep -i unryo- |xargs -n 1 rmdir
-
On Debian/Ubunty based distros (dpkg manager):
cp /opt/unryo-agent/etc/configuration-vault-client/vault-endpoint.toml /tmp/killall -9 unryo-vault-clientkillall -9 unryo-telegrafdpkg -r unryo-agentfind /etc |grep -i unryo- |xargs -n 1 rmfind /etc |grep -i unryo- |xargs -n 1 rmdir
-
If you are upgrading from a previous 1.X or higher release:
- Depending of your Linux Disto, upgrade the agent normally, example:
rpm -U ./Unryo-Agent-Linux-latest.rpmdpkg -i ./Unryo-Agent-Linux-latest.deb
- Validate that the vault-endpoint.toml configuration file persisted
- Validate that the unryo-vault and unryo-telegraf services are correctly restarted and running
Install the agent on Windows#
Step 1: Download the ZIP from https://downloads.unryo.com/Unryo-Agent-Windows-latest.zip and extract it.
- Extracted the ZIP file move the
Unryo-Agentfolder from the zip into yourC:\Program Files. - Instructions are in the UNRYO-README.txt inside the zip file, ideal for local or remote installation
Step 2: Edit C:\Program Files\Unryo-Agent\etc\configuration-vault-client\vault-endpoint.conf
- This is the only configuration file on the agent, everything else is from the Unryo Monitor Web interface
- When you upgrade the agent, this is the only file you need to keep
- Replace
<<<<MY_USERNAME>>>>and<<<<MY_PASSWORD>>>>with the username and password for the Portal user you created at Step 1, and replace<<<<MY_PORTAL_URL>>>>with your Portal URL. - Encode your credentials
(<username>:<password>)using the instructions found here. Copy the result and replace<<<<MY_ENCODED64_USER:CREDENTIALS>>>>with it.
Step 3: Start the agent:
This command installs the agent as a Windows service and starts it:
- Run
C:\Program Files\Unryo-Agent\install\install-unryo-telegraf-service.cmdas an administrator. - Run
C:\Program Files\Unryo-Agent\install\install-unryo-vault-service.cmdas an administrator. - From the Windows Task Scheduler, run the task called
Unryo Vault service
Windows Agent Upgrade
- Stop the Unryo-Vault task (using Windows Task Scheduler UI)
- Stop the Unryo-Telegraf service (using Windows Services UI)
- copy/backup the configuration file
C:\Program Files\Unryo-Agent\etc\configuration-vault-client\vault-endpoint.conf - delete and replace this folder by the one provided in the agent zip file:
C:\Program Files\Unryo-Agent - restore your configuration file
C:\Program Files\Unryo-Agent\etc\configuration-vault-client\vault-endpoint.conf - restart the Unryo-Vault task (using Windows Task Scheduler UI)
- restart the Unryo-Telegraf service (using Windows Services UI)
Indicate where to send data#
The first thing is to indicate the agent where to send its data.
- Unryo Agents send data to an Unryo Collector, which then routes it to the Unryo Platform.
- Unryo offers flexibility depending on your architecture. You can have all your Agents sending data to a central Unryo Collector. Or, if your environment is segmented (for example with distributed sites or multiple customers), you can consider using several Collectors.
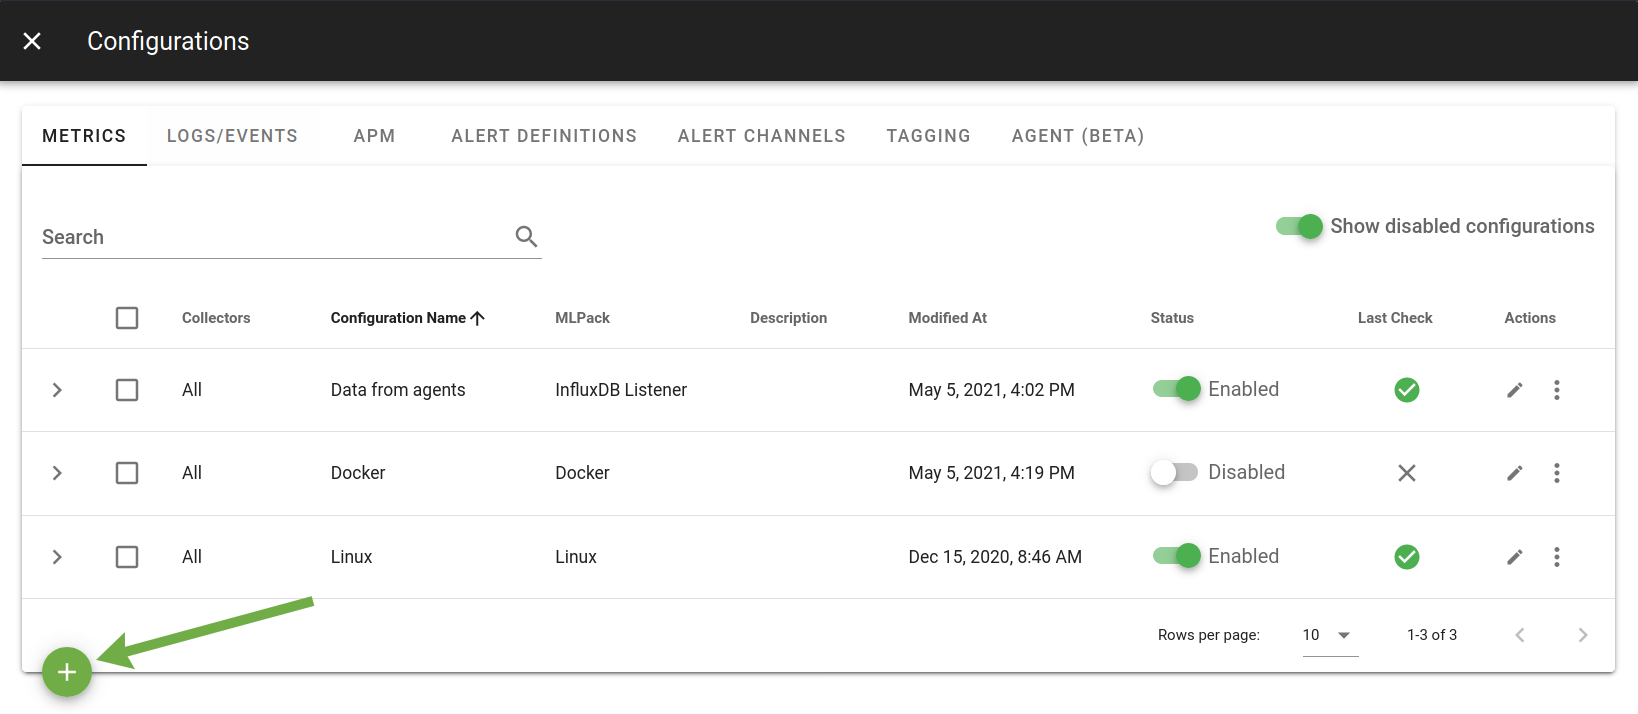
Go to "Configuration Management":

In the "Metrics" tab, click on the white-on-green "+":
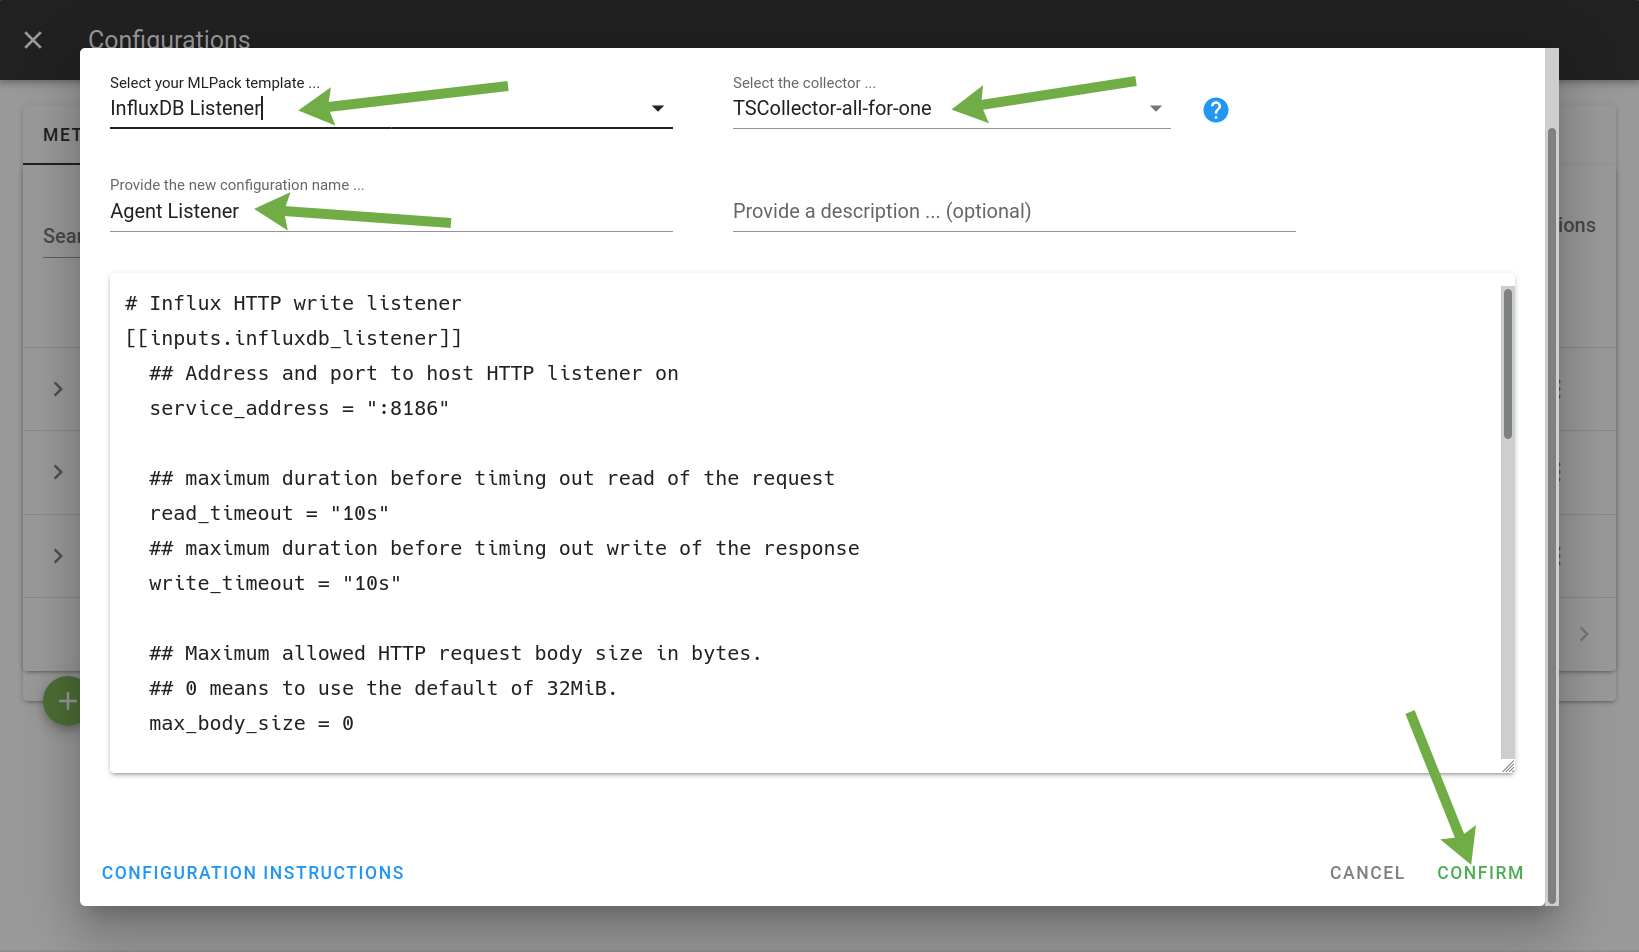
Select InfluxDB Listener as your template, your Unryo Collector as the
collector to deploy on, and give your configuration file a name and optionally
a description. The default contents will work fine. Only edit them if you know
what you are doing. Click on "Confirm" at the bottom right when you are done.
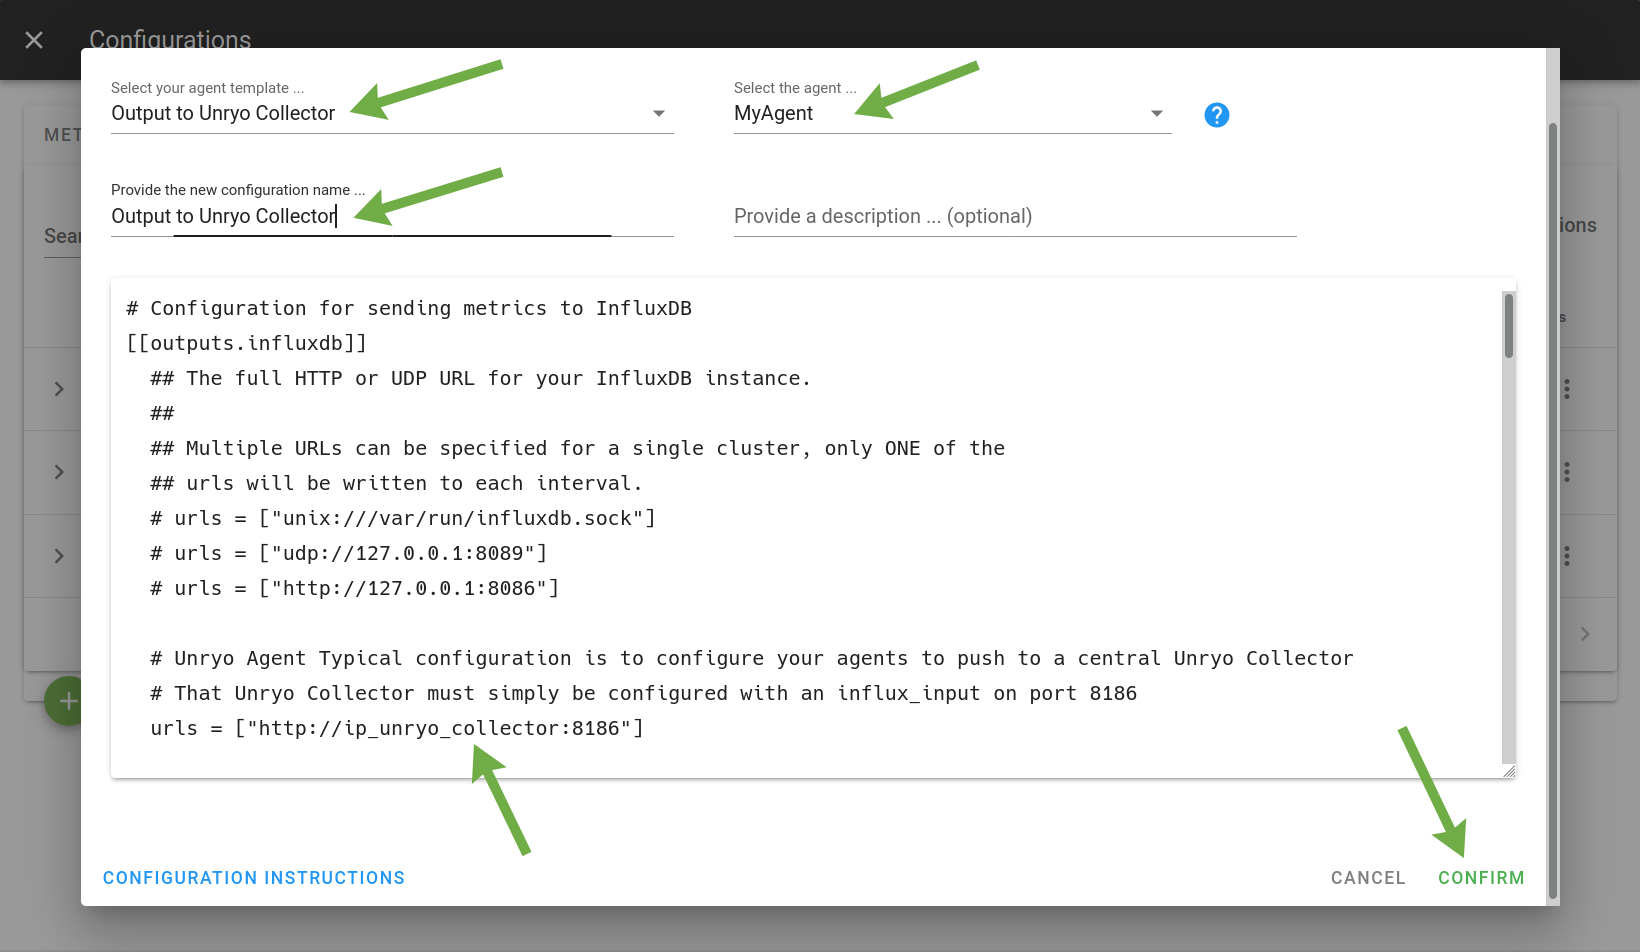
Then, go to the "Agent" tab and click on the white-on-green "+" to add another
configuration file. This time, select Output to Unryo Collector as the
template and your new Agent as the agent. Make sure to set
urls = ["<your Unryo collector address>"].
Start collecting data!#
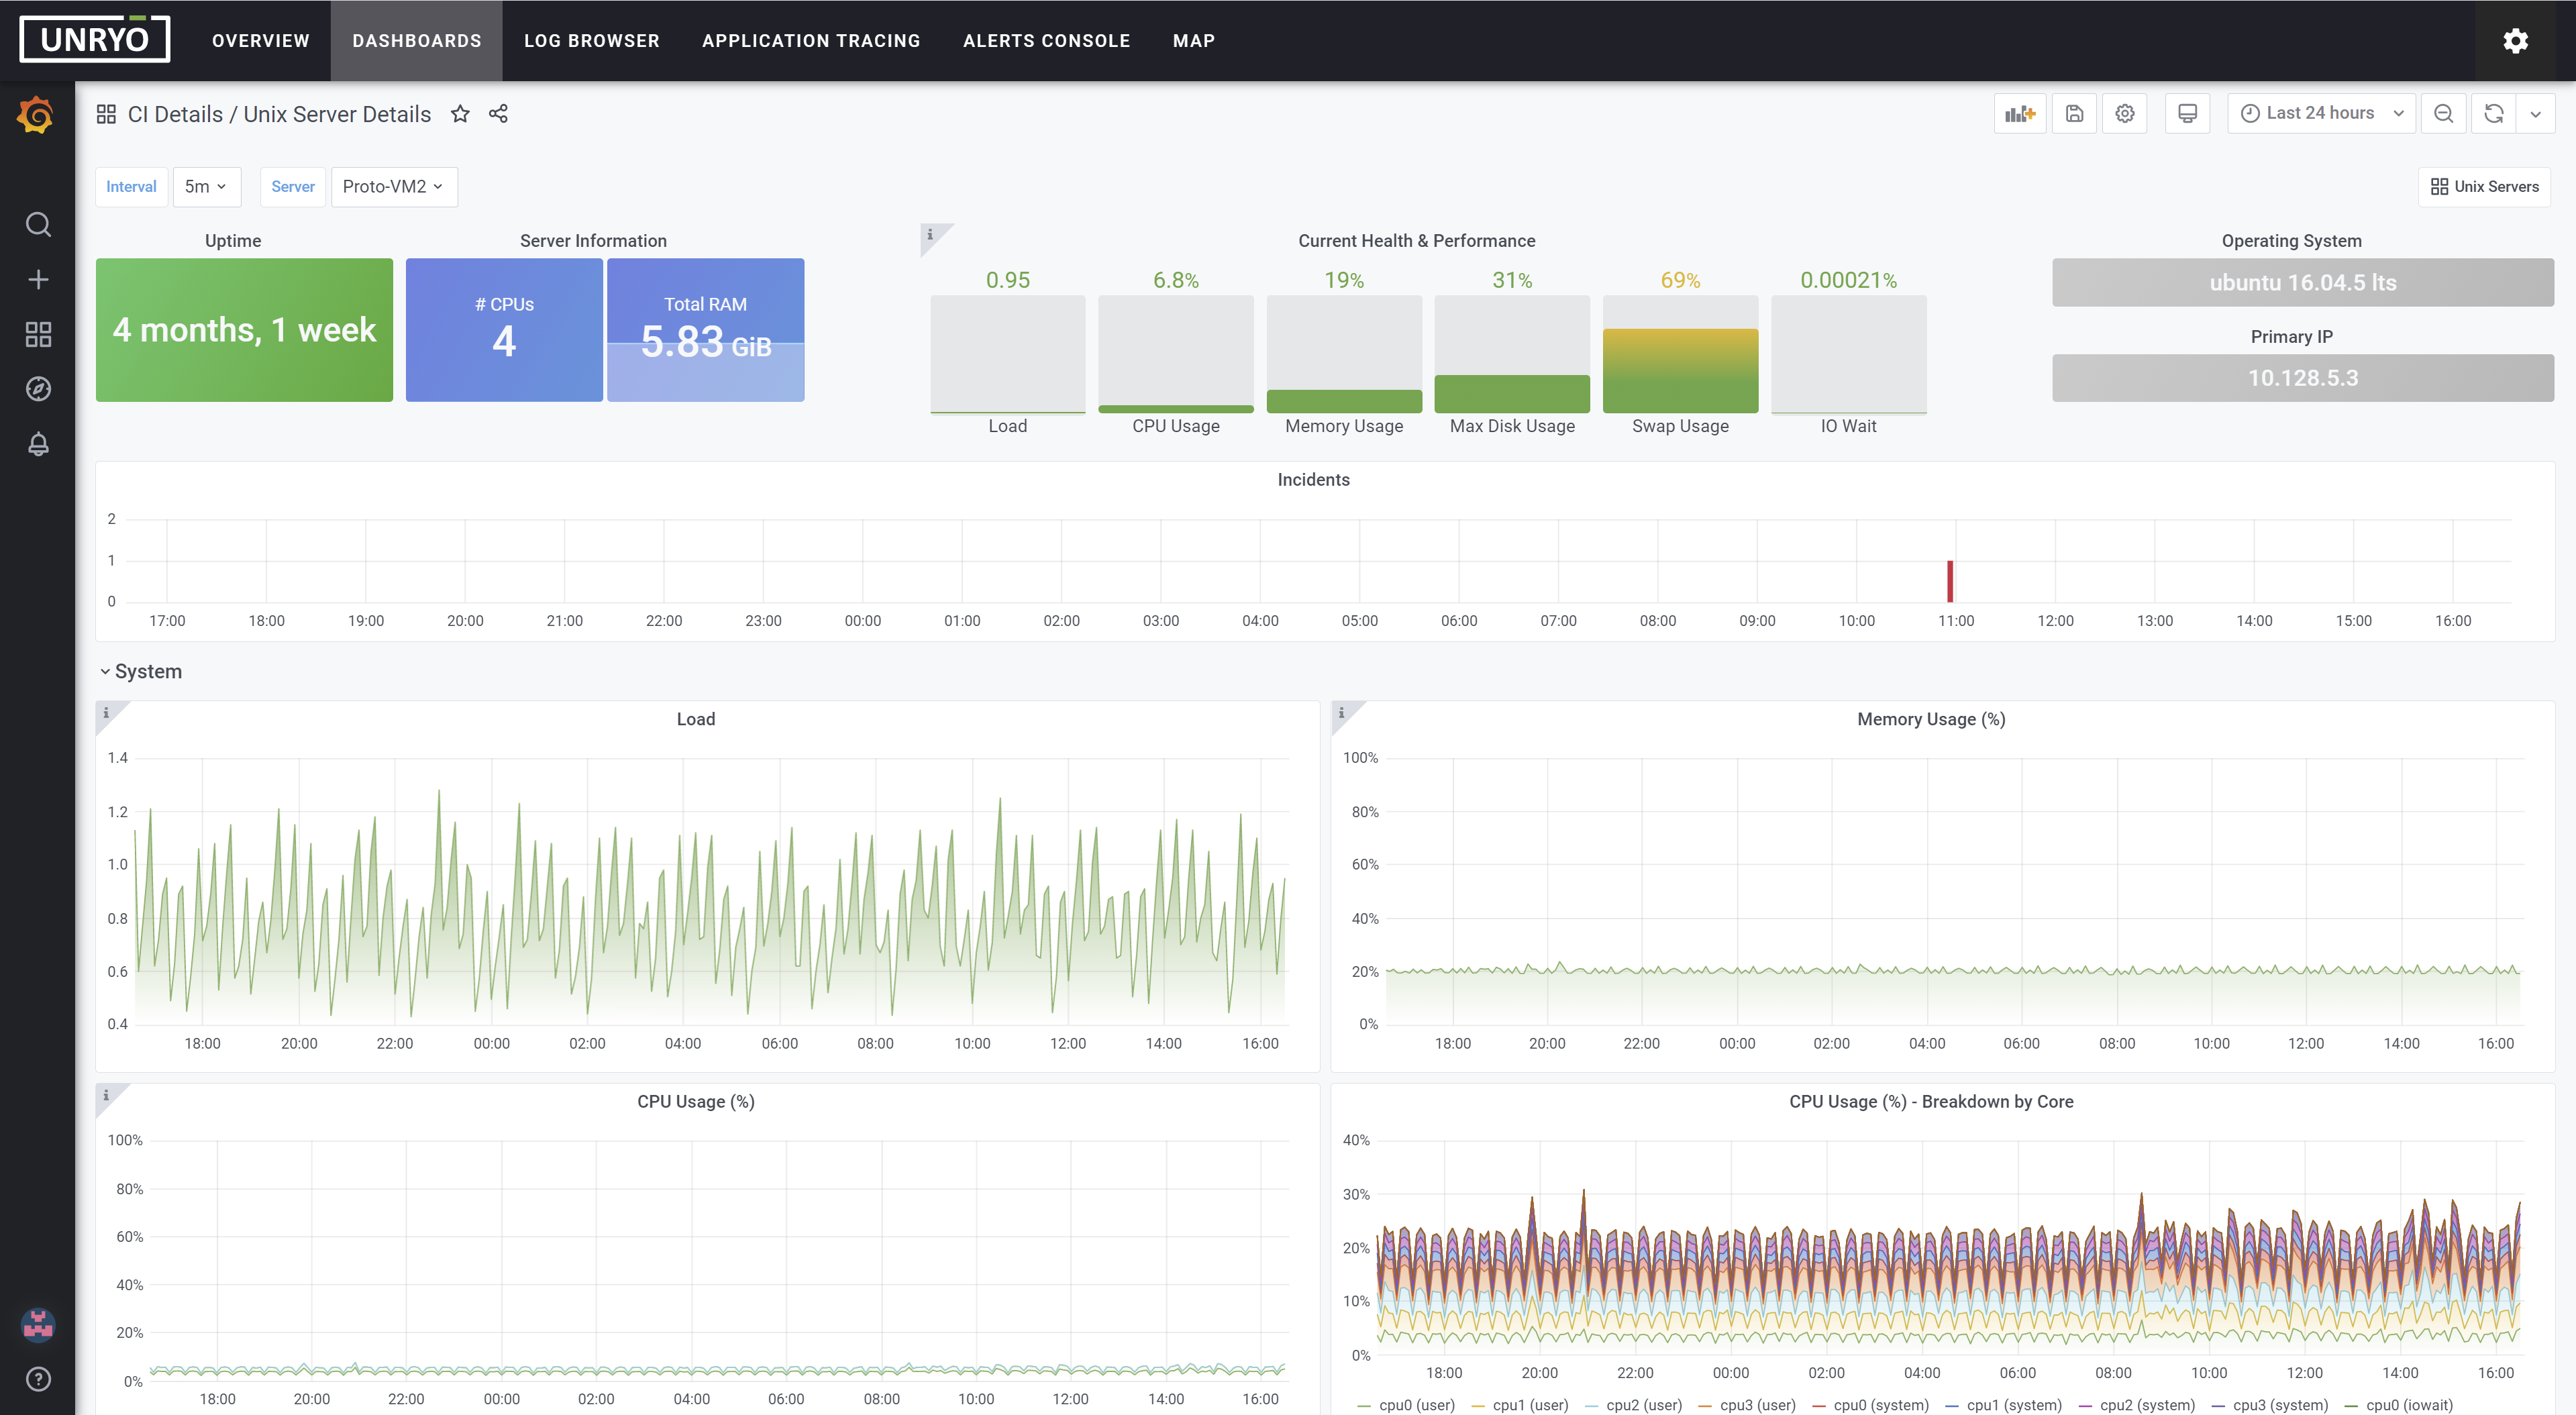
Your Agent is now actively monitoring your system; by default, it monitors the system's global performance, including the operating system, hardware and application processes. You can see dashboards and alerts (if any) from your Unryo Portal. You can also monitor other technologies by simply activating one of the predefined integrations.
Advanced Unryo Setups#
vApp Reverse Tunnel#
This document describes how to set up a central Unryo All-in-One (AiO) platform that receives data from Unryo vApp collector instance, with communication always being initiated by the AiO platform via a reverse tunnel. This is only relevant to customers that need this specific setup due to networking constraints.
The following diagram illustrates this architecture:

Configuration of the Central Unryo Installation (AiO)#
If you are responsible for the Central Unryo Installation (AiO), the following steps are for you; otherwise, you must make sure your Central Unryo Installation Administrator follows these steps and provides you with an authentication key.
Start by creating a new user called reversetunnel on the AiO host. Make its shell be
/sbin/nologin. E.g.: adduser -M -r -s /sbin/nologin reversetunnel
Create an ssh key pair you will use to authenticate to the AiO host. Make sure you
create the key pair for the reversetunnel user. The public key id_ed25519.pub will be
needed when setting up the vApp.
It is a common mistake to create the
.sshdirectory with the wrong permissions. Make sure it is owned by thereversetunneluser and is not accessible by other users. For example:
mkdir -p /home/reversetunnel/.ssh
chmod go-rwx /home/reversetunnel/.ssh
ssh-keygen -t ed25519 -f /home/reversetunnel/.ssh/id_ed25519
chown -R reversetunnel:reversetunnel /home/reversetunnel
Do not set a password on the key pair when prompted by
ssh-keygen.
If you don't have autossh tool on your host, install ssh and autossh on the AiO host.
Make sure you can connect to your vApp with ssh. This step is important because it also allows future ssh connections to recognize and trust your vApp.
su -s /bin/bash reversetunnel
ssh reversetunnel@vapp.customerX.com -p 10000
To have autossh persist after reboot, you must add each autossh command to your rc.local, or a custom service of your choice.
Here is an example for one autossh command:
autossh -f -M 0 -o ServerAliveInterval=15 -o ServerAliveCountMax=3 -gN -R 0.0.0.0:4224:localhost:4224 -R 0.0.0.0:8086:localhost:8086 -R 0.0.0.0:9200:localhost:9200 -R 0.0.0.0:8443:localhost:443 reversetunnel@vapp.customerX.com -p 10000
Edit your AiO's docker-compose.yml file such that UNRYO_HOSTNAME is set
to your AiO host's FQDN in the x-common-environment section.
Important: Using a real FQDN (and not IP) in your UNRYO_HOSTNAME is mandatory when using reverse-tunnel
Run docker-compose up -d on your AiO.
Your configuration is completed. Now, to configure your Collector vApp(s) with reverse tunnel listening, follow the steps here.
Collector vApp configuration#
Important information - It is mandatory to select "Collector" in the vApp Unryo Installation Type. - Configure the vApp with static IP, Gateway and DNS. - Configure the vApp using the Unryo Token and Vault Token provided by your Unryo Administrator
Fill out the three fields in the screenshot below to configure your vApp to accept connections from the AiO platform and create reverse tunnels.

Manual Proxy Host Configuration#
Manual Proxy Host Configuration for Linux
Step 1: Install sshd on the proxy host. Make sure "GatewayPorts" and "AllowTcpForwarding" are set to "yes" in
/etc/ssh/sshd_config.
Step 2: - We strongly recommend setting up a firewall or access list or other security mechanism for the port sshd listens on.
- Example to add at your server startup and present a secured port other than 22 (without impacting your normal ssh port):
    SRC="ip_of_my_unryo_central_server"
    RTPORT="the_tcp_port_i_will_securely_expose_to_my_unryo_central_server"

    echo "1" > /proc/sys/net/ipv4/ip_forward
    iptables -t nat -A PREROUTING -s ${SRC} -p tcp --dport ${RTPORT} -j REDIRECT --to 22
    iptables -t nat -A OUTPUT -s ${SRC} -p tcp --dport ${RTPORT} -j REDIRECT --to 22
Step 3: Create a new user called "reversetunnel" on both the proxy and AIO hosts. Make its
shell be /sbin/nologin.
- E.g.: adduser -M -r -s /sbin/nologin reversetunnel
- Install ssh and autossh on the AIO host.
- On the AIO host, create an ssh key pair you will use to authenticate to the
proxy host. Make sure you create the key pair for the reversetunnel user. Copy the
public key to /home/reversetunnel/.ssh/authorized_keys on the proxy.
- It is a common mistake to create the .ssh directory with the wrong
permissions. Make sure it is owned by the reversetunnel user and is not
accessible by other users. For example:
mkdir -p /home/reversetunnel/.ssh
  chmod go-rwx /home/reversetunnel/.ssh
  ssh-keygen -t ed25519 -f /home/reversetunnel/.ssh/id_ed25519
  chown -R reversetunnel:reversetunnel /home/reversetunnel
- Do not set a password on the key pair when prompted by ssh-keygen.
- Also note that you may need to run restorecon -R /home/reversetunnel on your
proxy host if you are using SELinux.
Step 4: Edit your proxy's docker-compose.yml. For both telegraf and fluentd, add
the following section:
yaml
   extra_hosts:
     - <Central_Unryo_FQDN>:<proxy_host_IP>
- Run docker-compose up -d on your proxy.
Installation completed on the proxy server
Manual Setup of the tunnel initiator on your Central Unryo
- Manually connect from the AIO to the proxy once, such that
sshwill later recognize the proxy host. This will test connectivity, and let you accept the host certificate.su -s /bin/bash reversetunnel ssh reversetunnel@proxy-host -p 11000 - Type yes when asked whether you recognize the host fingerprint. It is a good idea to actually check that it is the same as on your proxy host. You can find it in one of the
/etc/ssh/*.pubfiles. - Create a new service that will run autossh as follows. Make sure the task gets started and restarted automatically, and that it is run by the reversetunnel user.
autossh -f -M 0 -o "ServerAliveInterval=15" -o "ServerAliveCountMax=3" -gN -R 0.0.0.0:4224:localhost:4224 -R 0.0.0.0:8086:localhost:8086 -R 0.0.0.0:8443:localhost:443 -R 0.0.0.0:9200:localhost:9200 -p 11000 reversetunnel@proxy-host
- Make sure that your AIO's
docker-compose.ymlfileUNRYO_HOSTNAMEis set to your AIO host's FQDN in thex-common-environmentsection. - If changes are present in your docker-compose file, run
docker-compose up -don your AIO.